
Problem: I have address information in Excel and I have to make mailing labels.
Strategy: You can use the Mail Merge in Microsoft Word to make the labels. Here are the steps:
- Make sure your data in Excel is set up with each address going across a row.
- Have headings in row 1.
- Close the file in Excel.
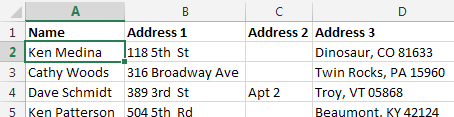
- Set up your data properly in Excel.
- Open a blank document in Microsoft Word.
- In Word, go to Mailings, Start Mail Merge, Labels.
- Choose the right size labels in the Label Options dialog. Click OK. You get a document full of blank labels.
- Go to Mailings, Select Recipients, Use an Existing List....
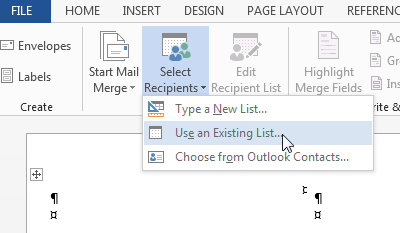
- Choose an existing list.
- Browse to and select your Excel file.
- In the Select Table dialog, choose Sheet1$. Make sure First Row of Data Contains Column Headers is selected. Click OK. You now a confusing <<Next Record>> in all but the first label.
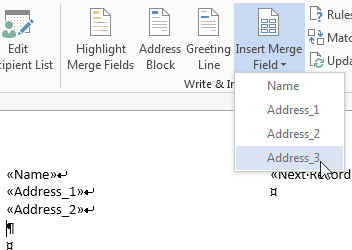
- Notice that the insertion point is in the first label. Go to Insert Merge Field and choose the first line of your address field.
- This is tough to do, but carefully press Shift+Enter to go to the next line without inserting a bunch of space.
- Repeat steps 10, 11, 10, 11, 10 until you have all four lines of the address in the label.
- Build the first label.
- If you want any special font, add that formatting to the first label.
- Press the Update Labels button to repeat your fields in all of the labels of the sheet.
- Choose Finish & Merge, Edit Individual Documents. You will have labels from the Excel data.
Gotcha: Step 14 seems to be the non-obvious step that trips most people up.